我要写的这一系列文章旨在分享一些我想要继续分享,但碍于《Flutter 开发之旅从南到北》中篇幅和话题的限制,没有深入分析的部分,读者们可以在学有余力的情况下在这里继续拓展下去。
本文要讨论的话题是 Flutter 中的文本渲染,也假定你已经大致清楚了 Flutter 中 Widget、Element 和 RenderObject 等概念。
正文
在之前的文章中就有提及,Flutter 源码中除了无状态(StatelessWidget)和有状态(StatefluWidget)这两个直接继承自 Widget 的组件外,还存在其他另类的 Widget,如**可以用来统一传里状态的可遗传组件 InheritedWidget**、 **用于自渲染组件的 RenderObjectWidget**,关于 StatelessWidget 和 StatefluWidget 的相关内容,我相信大部分读者已经接触的足够多了,那么,今天我们就来一起探究一下 RenderObjectWidget 的奥妙,看看它是如何帮助我们渲染组件的。

上图蓝色区域展示了 Flutter 内置的几种继承自 RenderObjectWidget 的组件,从名字就可以看出,LeafRenderObjectWidget 可用于自定义处于叶子结点组件的组件,而 SingleChildRenderObjectWidget 和 MultiChildRenderObjectWidget 就可以分别用来自定义具有单个或多个子组件的布局组件。
和 StatelessWidget、StatefluWidget 一样,RenderObjectWidget 并不负真正责组件的渲染工作,它依然是 Flutter 三棵树中组件树的一员,仅持有 Flutter 渲染组件的配置信息,不同的是,它可以实现 createRenderObject 方法直接创建 RenderObject 对象,这就给了我们一种可以渲染自定义组件的方式。
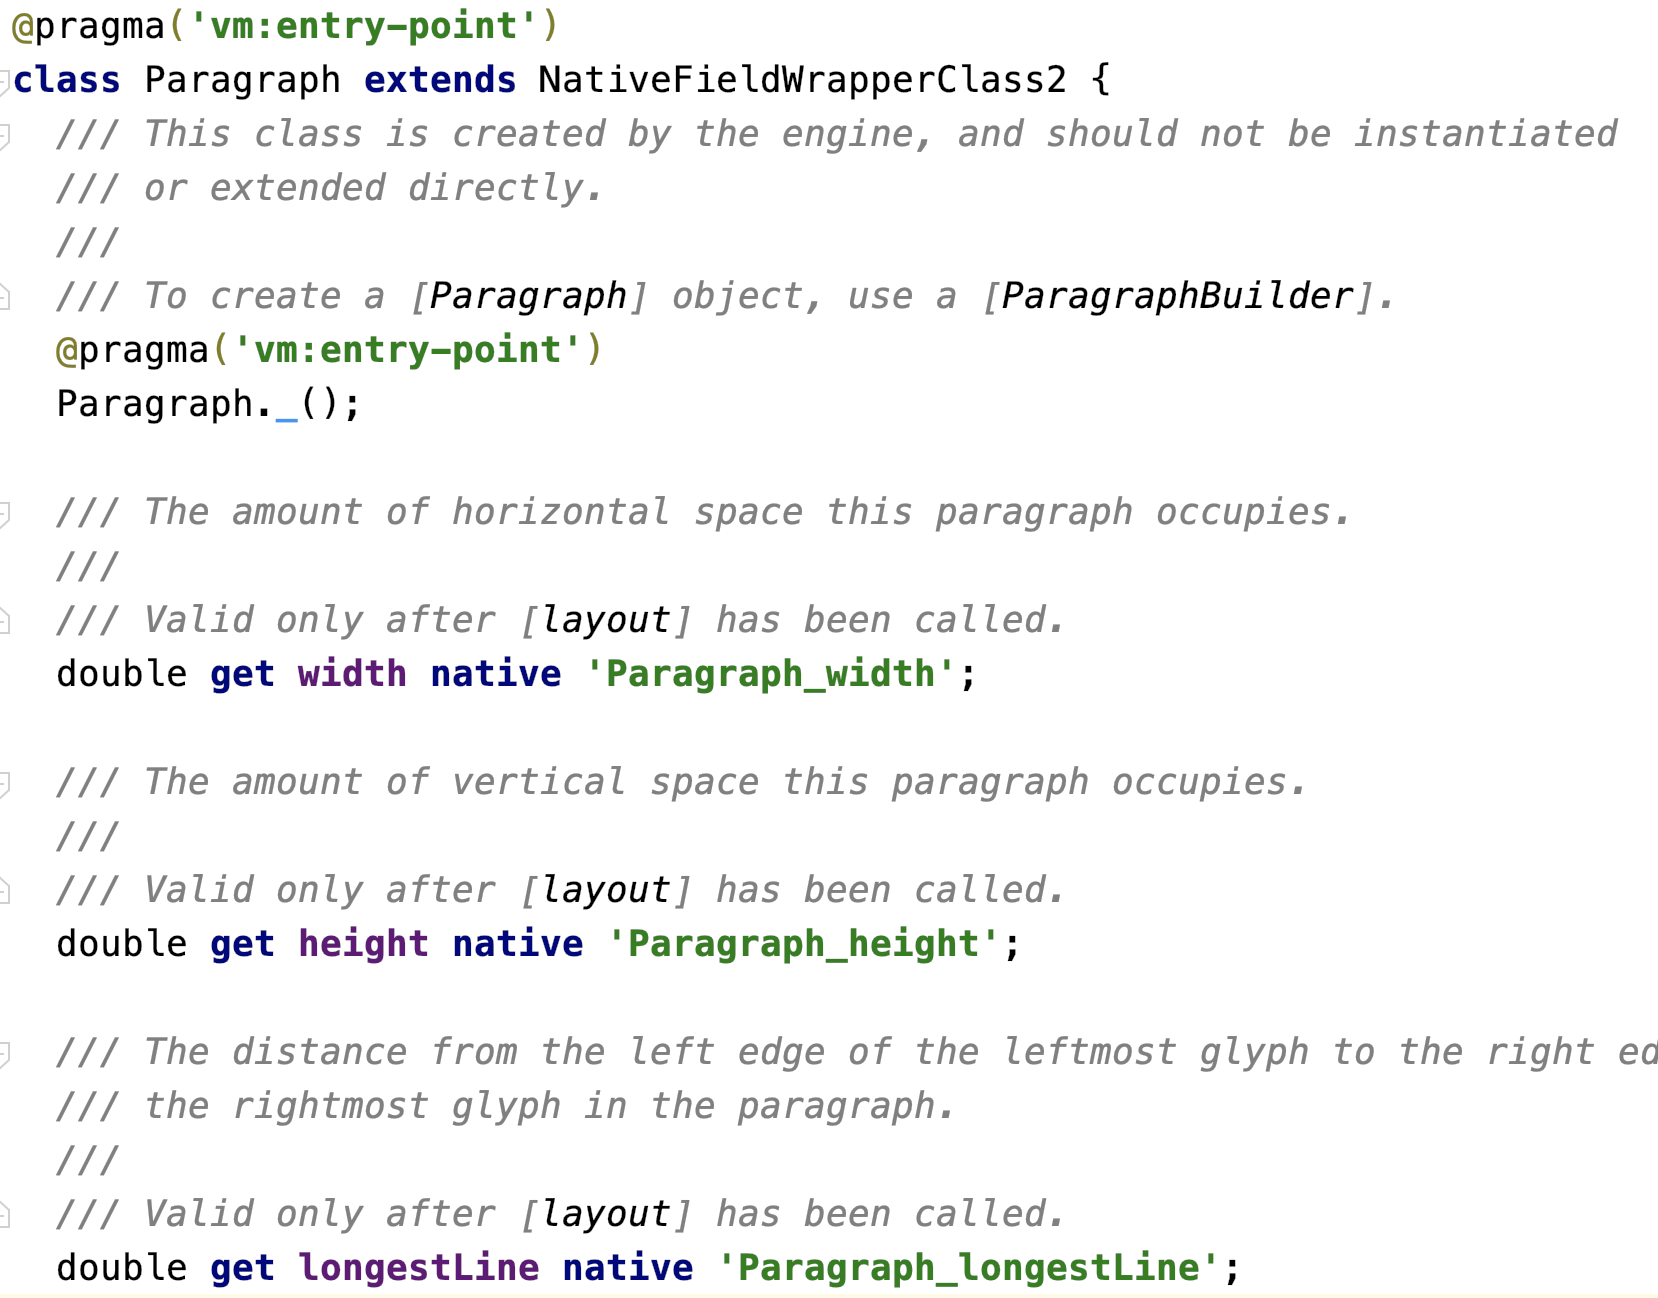
图 2 展示了 RenderObject 的所有子类,其中 RenderBox 最常被我们使用,它可以表示在组件间传递盒子约束的渲染对象,从而在屏幕中渲染出一个矩形块,在之前的文章中,我就通过使用它实现了一个自定义的居中布局组件。而 RenderBox 的子类 RenderParagraph 就是 Flutter 专门用来渲染文本的渲染对象。

依据以上描述,如果我们在 RenderObjectWidget 中使用 RenderParagraph 这个 RenderObject 对象就可以自定义一个自己的文本控件了,这就跟我们自定义居中布局组件一样简单,不一样的仅仅是,自定义文本组件使用的可能会是无子组件的 LeafRenderObjectWidget。
查看历史源码,Flutter 1.7 之前,专门用于渲染文本的 RichText 组件确实如我们预期继承自无子组件的 LeafRenderObjectWidget,而 Flutter 1.7 之后由于 RichText 也需要支持在内部嵌入 WidgetSpan 组件,实现图文混排的功能,因此改成了 MultiChildRenderObjectWidget 来实现:
1
2
3
4
5
6
7
8
9
10
| // 1.7 以前
class RichText extends LeafRenderObjectWidget {
// ...
}
// 1.7 以后
class RichText extends MultiChildRenderObjectWidget {
// ...
}
|
这对我们探究如何渲染文本并没有阻碍。最终,在 RichText 内部, RenderParagraph 这个渲染对象也就随之在 MultiChildRenderObjectWidget 的 createRenderObject 方法中生成出来了,代码如下所示:
1
2
3
4
5
6
7
8
9
10
11
12
13
14
15
16
| @override
RenderParagraph createRenderObject(BuildContext context) {
assert(textDirection != null || debugCheckHasDirectionality(context));
return RenderParagraph(text,
textAlign: textAlign,
textDirection: textDirection ?? Directionality.of(context),
softWrap: softWrap,
overflow: overflow,
textScaleFactor: textScaleFactor,
maxLines: maxLines,
strutStyle: strutStyle,
textWidthBasis: textWidthBasis,
textHeightBehavior: textHeightBehavior,
locale: locale ?? Localizations.localeOf(context, nullOk: true),
);
}
|
RenderParagraph
将大致流程介绍完后,我们再往更深入探究,如下是 Flutter 整体架构图:
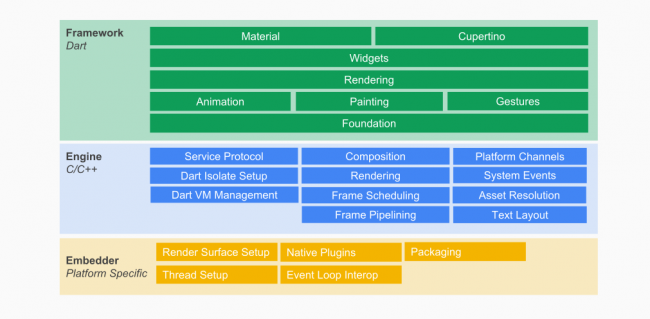
RenderObjectWidget 作为一个普普通通的 widget,毫无疑问是处在架构图中 framework 的 Widget 层,然而它的渲染对象 RenderParagraph 就已经到了 Rendering 层了,走进 RenderParagraph 这个类,发现它就是直接继承自我们熟悉的 RenderBox:
1
2
3
4
| class RenderParagraph extends RenderBox
with ContainerRenderObjectMixin<RenderBox, TextParentData>,
RenderBoxContainerDefaultsMixin<RenderBox, TextParentData>,
RelayoutWhenSystemFontsChangeMixin
|
也就是说,它依然会接受盒子约束限制自己的宽高,他依然渲染的是一个矩形,只不过在矩形内部渲染的子组件是文本而已。
当然,RenderParagraph 作为渲染对象也并不是无所不能,他内部完成渲染文本的使命还主要依靠一个 TextPainter 类型的对象 _textPainter。在 RenderParagraph 的 performLayout 方法和 paint 方法中都使用到了 _textPainter 对象来实现文本的最终绘制,部分代码如下:
1
2
3
4
5
6
7
8
9
10
11
12
13
14
15
16
17
18
|
@override
void performLayout() {
final BoxConstraints constraints = this.constraints;
_layoutTextWithConstraints(constraints);
final Size textSize = _textPainter.size;
size = constraints.constrain(textSize);
}
@override
void paint(PaintingContext context, Offset offset) {
_textPainter.paint(context.canvas, offset);
}
|
所以说, TextPainter 才是我们下一步要继续深挖的内容。
TextPainter
到了 TextPainter 就处于架构图中 framework 的 Painting 层了,我们正一步一步逼近根源,在这里,Flutter 会将每种样式的文本分段构成 ui.Paragraph 对象 _paragraph, 每个 ui.Paragraph 对象又由 ParagraphBuilder 生成,ParagraphBuilder 可以接受一个 ui.ParagraphStyle 对象,主要用来配置每个 Paragraph 的最大行数、文本方向、截断方式等信息(在上层我们可以通过 TextStyle 来定义)。TextPainter 类中的 _createParagraphStyle 方法专门用来生成 ui.ParagraphStyle 对象,如下:
1
2
3
4
5
6
7
8
9
10
11
12
13
14
15
16
17
18
19
20
| ui.ParagraphStyle _createParagraphStyle([ TextDirection defaultTextDirection ]) {
return _text.style?.getParagraphStyle(
textAlign: textAlign,
textDirection: textDirection ?? defaultTextDirection,
textScaleFactor: textScaleFactor,
maxLines: _maxLines,
textHeightBehavior: _textHeightBehavior,
ellipsis: _ellipsis,
locale: _locale,
strutStyle: _strutStyle,
) ?? ui.ParagraphStyle(
textAlign: textAlign,
textDirection: textDirection ?? defaultTextDirection,
maxLines: maxLines,
textHeightBehavior: _textHeightBehavior,
ellipsis: ellipsis,
locale: locale,
);
}
|
从这段代码可以看出,用户如果没有自定义样式,TextPainter 也会为文本设置一个默认样式。ui.Paragraph 对象 _paragraph 就由此生成,下面就是 TextPainter 中 layout 方法的部分代码(该方法会在 RenderParagraph 布局内部文本时被调用):
1
2
3
4
5
6
7
8
9
10
| void layout({ double minWidth = 0.0, double maxWidth = double.infinity }) {
if (_paragraph == null) {
final ui.ParagraphBuilder builder = ui.ParagraphBuilder(_createParagraphStyle());
_text.build(builder, textScaleFactor: textScaleFactor, dimensions: _placeholderDimensions);
_paragraph = builder.build();
}
}
|
最后,TextPainter 直接在 paint 方法中将生成的 _paragraph 对象传入 canvas.drawParagraph 就可以把文本在画布中渲染出来了:
1
2
3
4
| void paint(Canvas canvas, Offset offset) {
canvas.drawParagraph(_paragraph, offset);
}
|
这里,ParagraphBuilder 和 Paragraph 这两个类其实已经处于 framework 层中的最底层 Foundation 了,读者们也可以发现其中大部分的函数已经变成了在引擎层实现的空函数了。
文本渲染引擎
到这里,我们已经自顶向下走过了 Flutter 整个 framework 层了,由于引擎层代码主要使用 C/C++ 编写,因此没办法在 Android Studio/VSCode 直接阅读,感兴趣的读者们可以自己在本地编译一份 Flutter Engine 代码,也可以直接到官方仓库(https://github.com/flutter/engine/)在线阅读。
Flutter 引擎层用来渲染文本的引擎叫做 LibTxt,代码集中放在 engine/third_party/txt/ 中,该库依赖了Minikin、ICU、HarfBuzz、Skia 等多个其他引擎库,内容比较庞大,我们暂不深究这一块内容。
最佳实践
理论的描述终究还是有点抽象,下面我们就来自己定义一个用来渲染文本的组件,其中就涉及到了对 TextPainter 和 Paragraph 的改写,
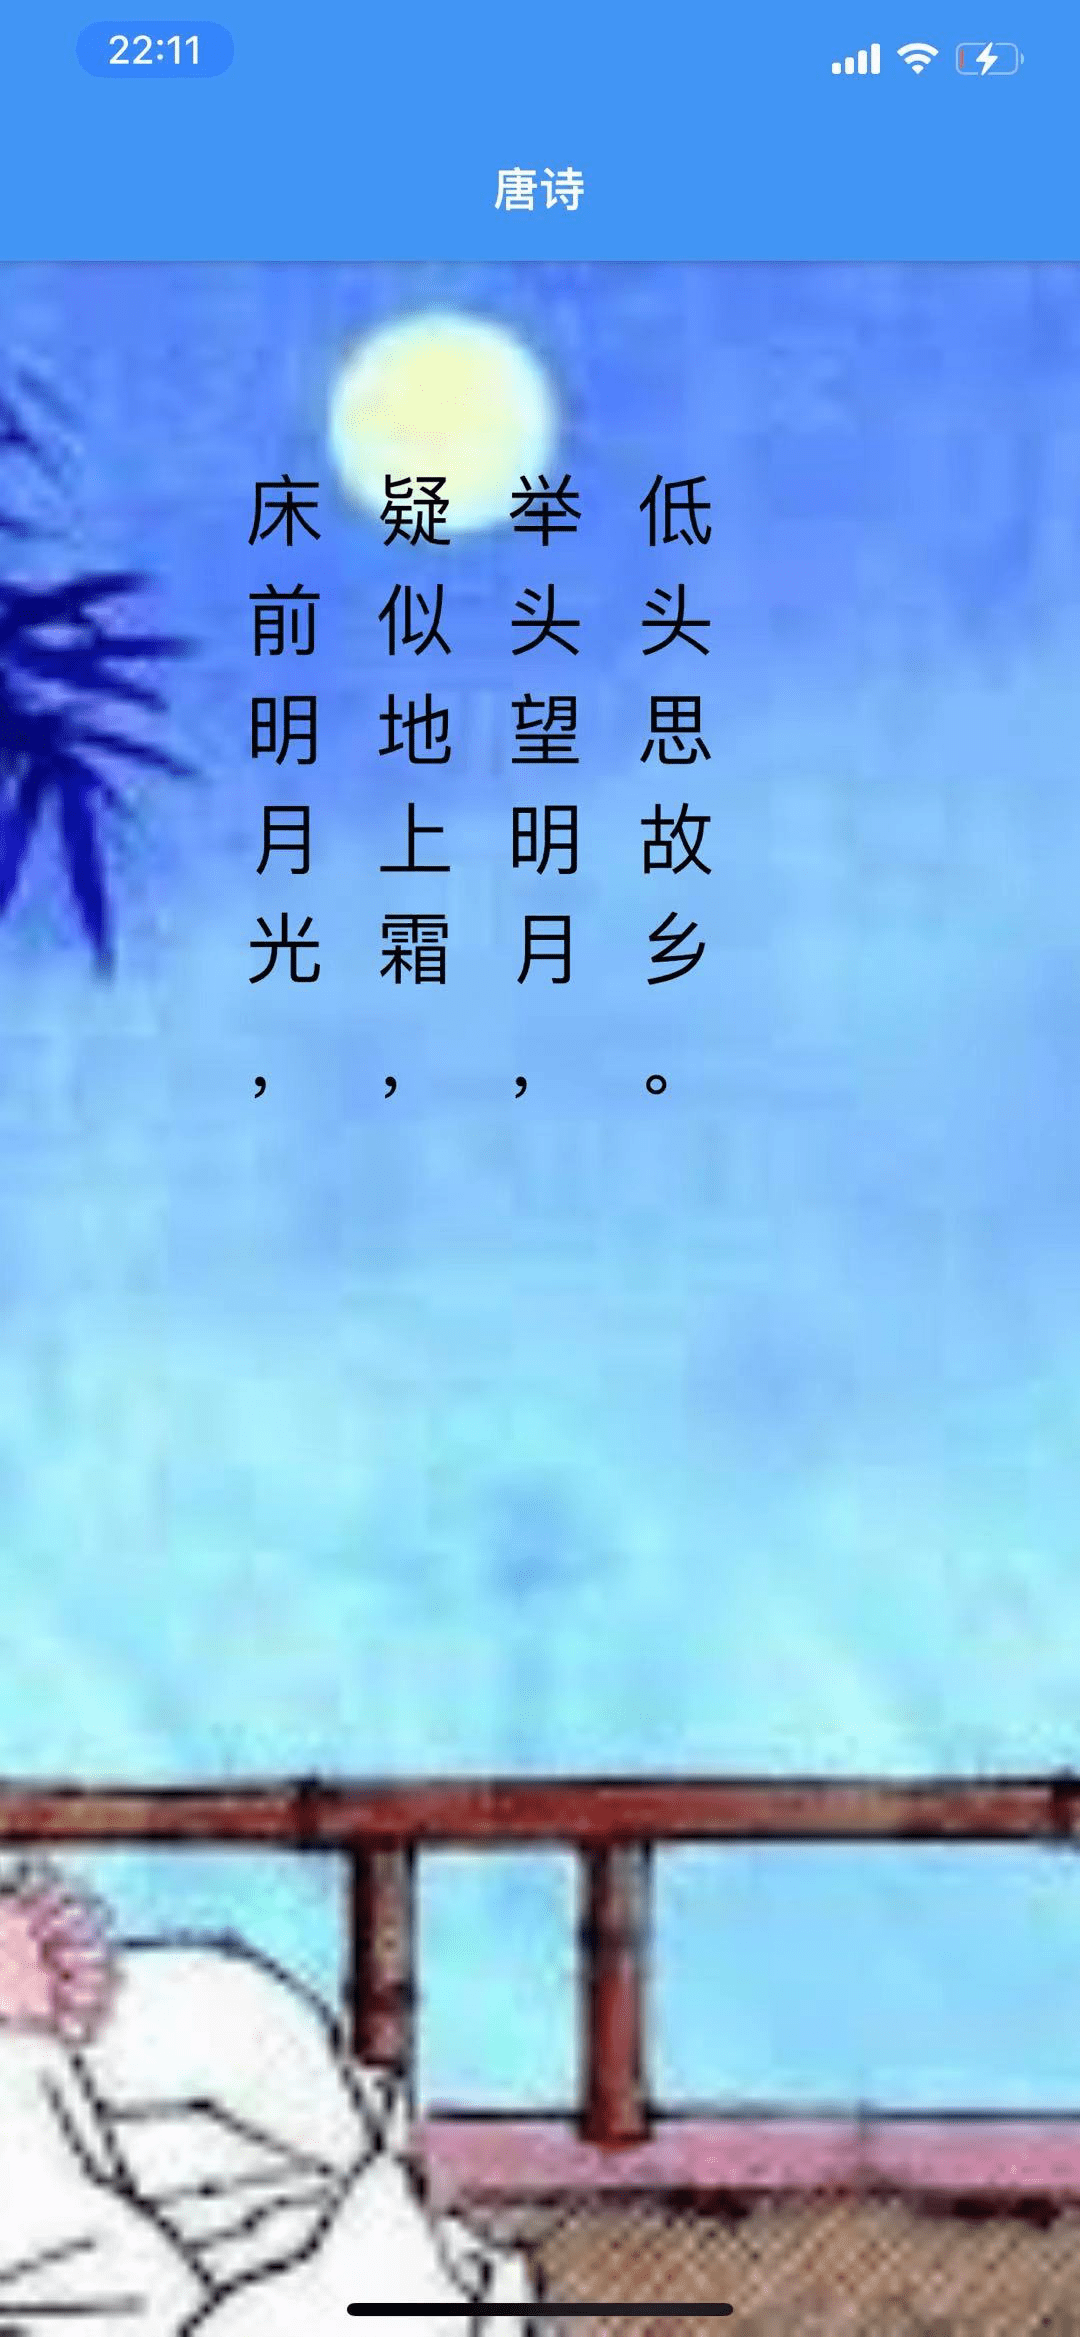
我们要做的这个文本组件 Flutter 官方并未提供,他可以用来将传入的文本垂直展示,因为正好可以用来展示我们的中国诗词,所以我将它命名为了 PoetryText,使用方法如下:
1
2
3
4
5
6
7
8
9
| PoetryText(
text: TextSpan(
text: "床前明月光,疑似地上霜,举头望明月,低头思故乡。",
style: TextStyle(
color: Colors.black,
fontSize: 30,
),
),
)
|
整体效果:
如上所示,PoetryText 组件使用起来非常简单,接收一个 text 参数,传入一个特定样式的 TextSpan 即可,代码如下:
1
2
3
4
5
6
7
8
9
10
11
12
13
14
15
16
17
18
19
| class PoetryText extends LeafRenderObjectWidget {
const PoetryText({
Key key,
this.text,
}) : super(key: key);
final TextSpan text;
@override
RenderVerticalText createRenderObject(BuildContext context) {
return RenderVerticalText(text);
}
@override
void updateRenderObject(
BuildContext context, RenderVerticalText renderObject) {
renderObject.text = text;
}
}
|
PoetryText 继承自 LeafRenderObjectWidget,它的 createRenderObject 也方法返回一个我们自定义的渲染对象 RenderVerticalText,而这里的 updateRenderObject 方法主要用于 Widget 的配置更新。
RenderVerticalText 的代码也很简单:
1
2
3
4
5
6
7
8
9
10
11
12
13
14
15
16
17
18
19
20
21
22
23
24
25
26
27
28
29
30
31
32
33
34
35
36
37
38
39
40
41
42
43
44
45
46
47
48
49
50
51
52
53
54
55
56
57
58
59
60
61
62
63
64
65
66
67
68
69
70
71
72
73
74
75
76
77
78
79
80
81
82
83
84
85
86
87
88
89
90
91
92
93
94
95
| class RenderVerticalText extends RenderBox {
RenderVerticalText(TextSpan text)
: _textPainter = VerticalTextPainter(text: text);
final VerticalTextPainter _textPainter;
TextSpan get text => _textPainter.text;
set text(TextSpan value) {
switch (_textPainter.text.compareTo(value)) {
case RenderComparison.identical:
case RenderComparison.metadata:
return;
case RenderComparison.paint:
_textPainter.text = value;
markNeedsPaint();
break;
case RenderComparison.layout:
_textPainter.text = value;
markNeedsLayout();
break;
}
}
void _layoutText({
double minHeight = 0.0,
double maxHeight = double.infinity,
}) {
_textPainter.layout(
minHeight: minHeight,
maxHeight: maxHeight,
);
}
void _layoutTextWithConstraints(BoxConstraints constraints) {
_layoutText(
minHeight: constraints.minHeight,
maxHeight: constraints.maxHeight,
);
}
@override
double computeMinIntrinsicHeight(double width) {
_layoutText();
return _textPainter.minIntrinsicHeight;
}
@override
double computeMaxIntrinsicHeight(double width) {
_layoutText();
return _textPainter.maxIntrinsicHeight;
}
double _computeIntrinsicWidth(double height) {
_layoutText(minHeight: height, maxHeight: height);
return _textPainter.width;
}
@override
double computeMinIntrinsicWidth(double height) {
return _computeIntrinsicWidth(height);
}
@override
double computeMaxIntrinsicWidth(double height) {
return _computeIntrinsicWidth(height);
}
@override
double computeDistanceToActualBaseline(TextBaseline baseline) {
return _textPainter.height;
}
@override
void performLayout() {
_layoutTextWithConstraints(constraints);
final Size textSize = _textPainter.size;
size = constraints.constrain(textSize);
}
@override
void paint(PaintingContext context, Offset offset) {
_textPainter.paint(context.canvas, offset);
}
}
|
每个 RenderObject 都会经历 layout 和 paint 两个过程,如这里继承自 RenderBox 的 RenderVerticalText ,其中重写了一系列方法,在 performLayout() 和 paint() 分别用来做布局和渲染两个过程。
当然,在屏幕中渲染的任务还是主要交给了 VerticalTextPainter 类型的对象 _textPainter,它的代码如下:
1
2
3
4
5
6
7
8
9
10
11
12
13
14
15
16
17
18
19
20
21
22
23
24
25
26
27
28
29
30
31
32
33
34
35
36
37
38
39
40
41
42
43
44
45
46
47
48
49
50
51
52
53
54
55
56
57
58
59
60
61
62
63
64
65
66
67
68
69
70
71
72
73
74
75
76
77
78
79
80
81
82
83
84
85
86
87
88
| import 'package:flutter/painting.dart';
import 'package:steppe_up/dartui/vertical_paragraph.dart';
import 'package:steppe_up/dartui/vertical_paragraph_builder.dart';
import 'package:steppe_up/model/vertical_paragraph_constraints.dart';
class VerticalTextPainter {
VerticalTextPainter({TextSpan text}) : _text = text;
VerticalParagraph _paragraph;
bool _needsLayout = true;
TextSpan get text => _text;
TextSpan _text;
set text(TextSpan value) {
if (_text == value) return;
_text = value;
_paragraph = null;
_needsLayout = true;
}
double _applyFloatingPointHack(double layoutValue) {
return layoutValue.ceilToDouble();
}
double get minIntrinsicHeight {
return _applyFloatingPointHack(_paragraph.minIntrinsicHeight);
}
double get maxIntrinsicHeight {
return _applyFloatingPointHack(_paragraph.maxIntrinsicHeight);
}
double get width {
return _applyFloatingPointHack(_paragraph.width);
}
double get height {
return _applyFloatingPointHack(_paragraph.height);
}
Size get size {
return Size(width, height);
}
double _lastMinHeight;
double _lastMaxHeight;
void layout({double minHeight = 0.0, double maxHeight = double.infinity}) {
if (!_needsLayout &&
minHeight == _lastMinHeight &&
maxHeight == _lastMaxHeight) return;
_needsLayout = false;
if (_paragraph == null) {
final VerticalParagraphBuilder builder = VerticalParagraphBuilder(null);
_applyTextSpan(builder, _text);
_paragraph = builder.build();
}
_lastMinHeight = minHeight;
_lastMaxHeight = maxHeight;
_paragraph.layout(VerticalParagraphConstraints(height: maxHeight));
if (minHeight != maxHeight) {
final double newHeight = maxIntrinsicHeight.clamp(minHeight, maxHeight);
if (newHeight != height)
_paragraph.layout(VerticalParagraphConstraints(height: newHeight));
}
}
void _applyTextSpan(VerticalParagraphBuilder builder, TextSpan textSpan) {
final style = textSpan.style;
final text = textSpan.text;
final bool hasStyle = style != null;
if (hasStyle) {
builder.textStyle = style;
}
if (text != null) {
builder.text = text;
}
}
void paint(Canvas canvas, Offset offset) {
_paragraph.draw(canvas, offset);
}
}
|
该类源自 TextPainter,TextPainter 的默认的实现是将文本水平绘制,而这里我们就可以修改部分逻辑,通过传入的文本定义自己文本组件的宽高,实现垂直展示的文本组件。
与 Flutter 源码保持一致,我们再将任务交给与 Flutter 中 Paragraph 对应的 VerticalParagraph:
1
2
3
4
5
6
7
8
9
10
11
12
13
14
15
16
17
18
19
20
21
22
23
24
25
26
27
28
29
30
31
32
33
34
35
36
37
38
39
40
41
42
43
44
45
46
47
48
49
50
51
52
53
54
55
56
57
58
59
60
61
62
63
64
65
66
67
68
69
70
71
72
73
74
75
76
77
78
79
80
81
82
83
84
85
86
87
88
89
90
91
92
93
94
95
96
97
98
99
100
101
102
103
104
105
106
107
108
109
110
111
112
113
114
115
116
117
118
119
120
121
122
123
124
125
126
127
128
129
130
131
132
133
134
135
136
137
138
139
140
141
142
143
144
145
146
147
| import 'dart:math' as math;
import 'dart:ui' as ui;
import 'package:flutter/painting.dart';
import 'package:steppe_up/model/line_info.dart';
import 'package:steppe_up/model/text_run.dart';
import 'package:steppe_up/model/text_zi.dart';
import 'package:steppe_up/model/vertical_paragraph_constraints.dart';
import 'package:steppe_up/util/line_breaker.dart';
class VerticalParagraph {
VerticalParagraph(this._paragraphStyle, this._textStyle, this._text);
ui.ParagraphStyle _paragraphStyle;
ui.TextStyle _textStyle;
String _text;
double _width;
double _height;
double _minIntrinsicHeight;
double _maxIntrinsicHeight;
double get width => _width;
double get height => _height;
double get minIntrinsicHeight => _minIntrinsicHeight;
double get maxIntrinsicHeight => _maxIntrinsicHeight;
List<Word> _words = [];
void layout(VerticalParagraphConstraints constraints) =>
_layout(constraints.height);
void _layout(double height) {
if (height == _height) {
return;
}
int count = _text.length;
for (int i=0; i<count; i++) {
_addWord(i);
}
_calculateLineBreaks(height);
_calculateWidth();
_height = height;
_calculateIntrinsicHeight();
}
void _addWord(int index) {
final builder = ui.ParagraphBuilder(_paragraphStyle)
..pushStyle(_textStyle)
..addText(_text.substring(index, index + 1));
final paragraph = builder.build();
paragraph.layout(ui.ParagraphConstraints(width: double.infinity));
final run = Word(index, paragraph);
_words.add(run);
}
List<LineInfo> _lines = [];
void _calculateLineBreaks(double maxLineLength) {
if (_words.isEmpty) {
return;
}
if (_lines.isNotEmpty) {
_lines.clear();
}
int start = 0;
int end;
double lineWidth = 0;
double lineHeight = 0;
for (int i=0; i<_words.length; i++) {
end = i;
final word = _words[i];
final wordWidth = word.paragraph.maxIntrinsicWidth;
final wordHeight = word.paragraph.height;
if (_text.substring(i, i + 1) == "," || _text.substring(i, i + 1) == "。") {
lineWidth += math.max(lineWidth, wordWidth);
_addLine(start, end+1, lineWidth, lineHeight);
start = end + 1;
lineWidth = 0;
lineHeight = 0;
} else {
lineHeight += wordHeight;
}
}
end = _words.length;
if (start < end) {
_addLine(start, end, lineWidth, lineHeight);
}
}
void _addLine(int start, int end, double width, double height) {
final bounds = Rect.fromLTRB(0, 0, width, height);
final LineInfo lineInfo = LineInfo(start, end, bounds);
_lines.add(lineInfo);
}
void _calculateWidth() {
double sum = 0;
for (LineInfo line in _lines) {
sum += line.bounds.width;
}
_width = sum;
}
void _calculateIntrinsicHeight() {
double sum = 0;
double maxRunHeight = 0;
for (LineInfo line in _lines) {
sum += line.bounds.width;
maxRunHeight = math.max(line.bounds.height, maxRunHeight);
}
_minIntrinsicHeight = maxRunHeight;
_maxIntrinsicHeight = maxRunHeight;
}
void draw(Canvas canvas, Offset offset) {
canvas.save();
canvas.translate(offset.dx, offset.dy);
for (LineInfo line in _lines) {
canvas.translate(line.bounds.width + 20, 0);
double dy = 0;
for (int i = line.textRunStart; i < line.textRunEnd; i++) {
canvas.drawParagraph(_words[i].paragraph, Offset(0, dy));
dy += _words[i].paragraph.height;
}
}
canvas.restore();
}
}
|
如上代码所示,便可以真正的将传入的文本绘制在系统提供给我们的 canvas 中了,其中依附下层我们需要做的仅仅是将传入的文本使用 ui.ParagraphBuilder 封装在 ui.Paragraph 对象中,然后再绘制出将该对象传给 canvas.drawParagraph() 即可。
这样,我们自定义的 PoetryText 组件就完成了,包含的几个重要部分如下:
完整代码,参见:https://github.com/MeandNi/flutter_poetry_text
延伸阅读
Flutter.cn:https://api.flutter-io.cn/flutter/dart-ui/dart-ui-library.html
我的新书《Flutter 开发之旅从南到北》终于和大家见面了!(抽奖送书啦)
关注公众号「Meandni」,及时阅读最新前沿技术动态,不至于落后时代。